
ReactorKit - 1
Intro
ReactorKit에 대해 알아보려고 한다.
ReactorKit github을 기준으로 알아보고 간단한 예제를 만들어볼까 한다.
rxSwift에 대한 이해가 떨어지지만 rxSwift에 대한 학습은 이후로 미뤄본다….
Basic Concept
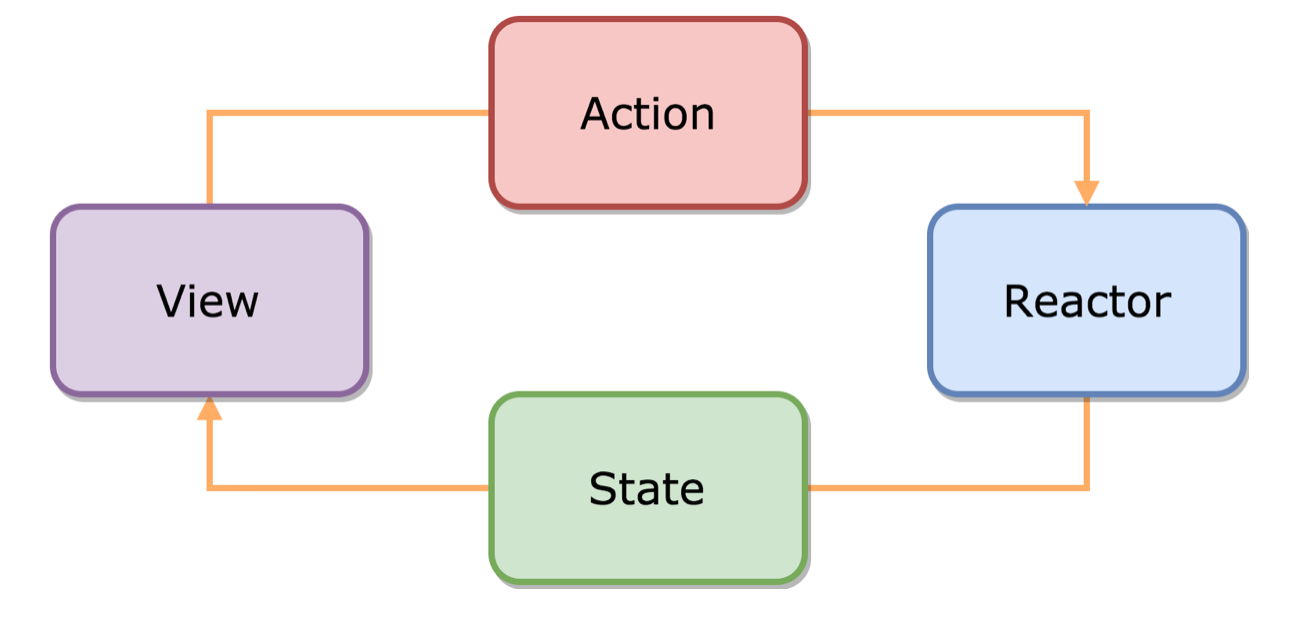
(ReactorKit을 살펴보면서 가장 중요한 다이어그램이라고 생각한다.)
- user action과 view state는 observable 스트림을 통해 다른 레이어로 전달된다.
- 스트림은 단방향이다.
- View는 action만 Reactor는 state만 방출한다.
View
View는 data를 표시한다.
(ViewController와 cell은 View로 다뤄진다.)
View는 사용자 입력을 action 스트림에 바인딩하고 View state를 각 UI 구성 요소에 바인딩한다.
View 레이어에는 비즈니스 로직을 포함하지 않는다.
View에는 action 스트림과 state 스트림을 어떻게 매핑할지를 정의한다.
view를 정의하기 위해서 View protocol을 채택한다.
프로토콜을 채택하면 reactor라는 프로퍼티가 자동으로 생긴다.
reactor는 view의 밖에서 지정된다.
class ProfileViewController: UIViewController, View {
  var disposeBag = DisposeBag()
}

profileViewController.reactor = ProfileViewReactor()
- ProfileViewController가
View프로토콜을 채택하고 있으므로reactor프로퍼티가 생겼다. reactor는 view의 밖에서 지정되므로 외부에서 profileViewController에reactor를 지정한다.
reactor 프로퍼티가 바뀔때 bind(reactor:)가 호출된다.
bind(reactor:)메서드를 구현하여 action, state 스트림 바인딩을 정의한다.
func bind(reactor: ProfileViewReactor) {
  // action (View -> Reactor)
  refreshButton.rx.tap.map { Reactor.Action.refresh }
  	.bind(to: reactor.action)
  	.disposed(by: self.disposeBag)

  // state (Reactor -> View)
  reactor.state.map { $0.isFollowing }
  	.bind(to: follwButton.rx.isSelected)
  	.disposed(by: self.disposeBag)
}
- refreshButton이 tap되면
refresh라는 action으로 바인딩한다. - reactor의 state 중 isFollowing을 바인딩한다.
Reactor
Reactor는 UI 독립적인 레이어로 view의 state를 관리한다.
Reactor의 가장 중요한 역할은 제어 흐름을 view에서 분리하는 것이다.
모든 view에는 관련된 reactor가 있고, 모든 로직은 reactor에게 위임한다.
reactor는 view에 의존성이 없어서 test가 쉽다.
-
Reactor프로토콜을 채택해 reactor를 정의한다. -
Reactor프로토콜은Action,Mutation,State세 가지 타입이 필요하다. -
Reactor프로토콜은initialState라는 프로퍼티가 필요하다.
class ProfileViewReactor: Reactor {
  // represent user actions
  enum Action {
    case refreshFollowingStatus(Int)
    case follow(Int)
  }

  // represent state changes
  enum Mutation {
    case setFollowing(Bool)
  }

  // represent the current view state
  struct State {
    var isFollowing: Bool = false
  }

  let initialState: State = State()
}
Action은 사용자 인터랙션을 나타내고 State는 view state를 나타낸다.
Mutation은 Action과 State 사이를 연결해준다.
reactor는 mutation()과 reduce() 두 단계로 action 스트림을 state 스트림으로 변환한다.
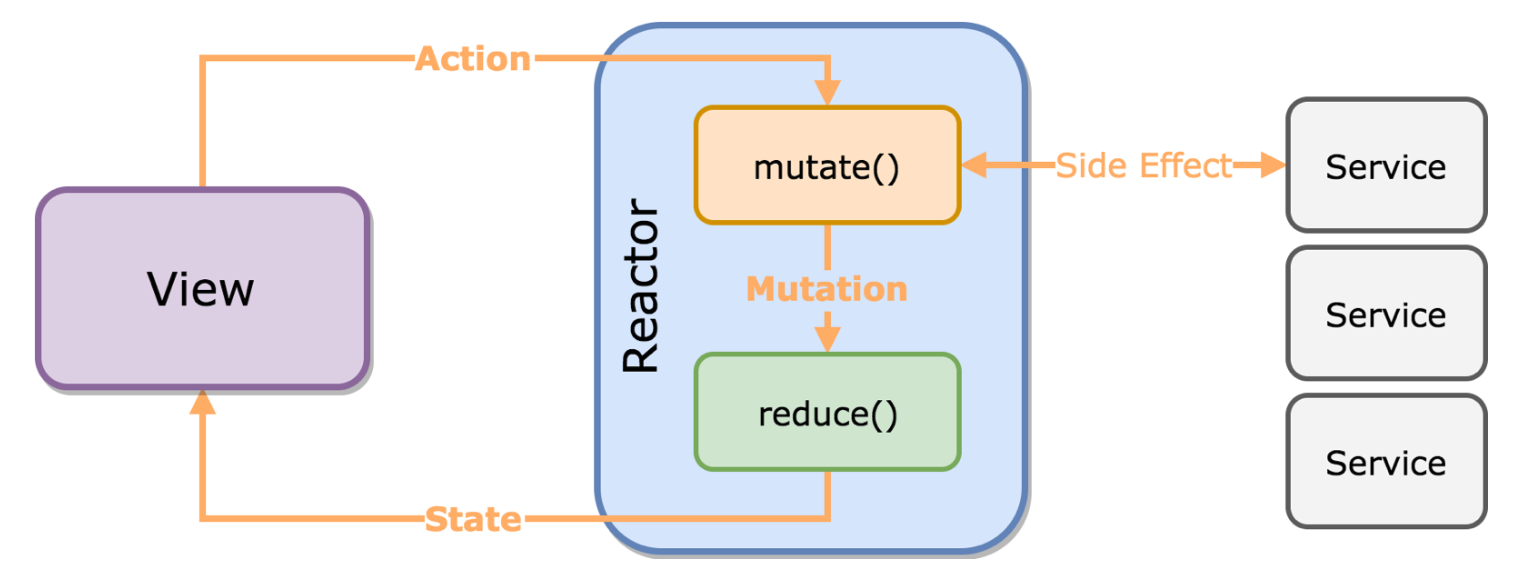
View와 Reactor에서 일어나는 과정을 좀 더 자세하게 본다면 위의 다이어그램과 같다.
Reactor가 Action을 받아서 어떻게 State를 emit하는지가 핵심이다.
Reactor는 Action을 받아mutate()를 실행한다.mutate()는 Action으로 Mutation을 생성한다.reduce()는 Mutation으로 State를 생성한다.
mutate()
mutate()는 Action을 받아서 Observable<Mutation>을 생성한다.
func mutate(action: Action) -> Observable<Mutation>
비동기 작업이나 API 호출과 같은 side effect 작업은 해당 메서드에서 실행된다.
func mutate(action: Action) -> Observable<Mutation> {
  switch action {
    case let .refreshFollowingStatus(userID): // receive an action
    	return UserAPI.isFollowing(userID) // create an API stream
    		.map { (isFollowing: Bool) -> Mutation in
         	return Mutation.setFollowing(isFollowing) // convert to Mutation stream
        }

    case let .follow(userID):
    	return UserAPI.follow()
    		.map { _ -> Mutation in
        	return Mutation.setFollowing(true)
        }
  }
}
reduce()
reduce()는 이전의 State와 Mutation으로 새로운 State를 생성한다.
func reduce(state: State, mutation: Mutation) -> State
이 메서드는 순수 함수이다.
새로운 State를 동기식으로 반환한다.
비동기 작업이나 API 호출과 같은 side effect 작업은 해당 메서드에서 실행하지 않는다.
func reduce(state: State, mutation: Mutation) -> State {
  var state = state // creawte a copy of the old state
  switch mutation {
    case let .setFollowing(isFollowing):
    	state.isFollowing = isFollowing // manipulate the state, creating a new stae
    	return state // return the new state
  }
}
transform()
transform()은 각 스트림으로 변환한다.
func transform(action: Observable<Action>) -> Observable<Action>
func transform(mutation: Observable<Mutation>) -> Observable<Mutation>
func transform(state: Observable<State>) -> Observable<State>
위와 같은 메서드를 구현해 다른 observable 스트림으로 변환하고 결합한다.
예를 들어 transform(mutation:)은 global event 스트림을 mutation 스트림에 결합할 수 있다.
func transform(action: Observable<Action>) -> Observable<Action> {
  return action.debug("action") // Use RxSwift's debug() operator
}
위의 메서드는 디버깅 목적으로 사용할 수 있다.
Outro
ReactorKit의 Basic Concept에 대해서 알아봤다.
대강의 흐름을 알 수 있었고, 코드를 까보고 싶어졌다….ㅋㅋㅋ
Leave a comment